
How To Put On Snowboard Boots – Beginner Tips
In this article, titled “How To Put On Snowboard Boots – Beginner Tips,” the author shares a video by SnowboardProCamp and provides some helpful advice for beginners on the proper way to put on snowboard boots. The author highlights the importance of correctly putting on snowboard boots due to the different types of laces, inner drawstrings, and straps involved. They mention that improper boot fitting can lead to foot pain and affect performance while snowboarding. The author encourages readers to check out the beginner snowboarding playlist for more tips and invites them to leave any questions about snowboard boots in the comments section.
The second paragraph features a third-person perspective narration by Kevin, who appears in the video. Kevin shares his beginner tips for putting on snowboard boots, emphasizing the potential difficulties that arise from the various components of the boots. He discusses the importance of aligning the tongue of the boot properly, managing the inner drawstring, and adjusting the laces for a comfortable fit. Kevin suggests rolling up pants and wearing snowboard socks or long socks for a better fit. He concludes by advising readers on how to remove their boots and encourages them to watch the video for more tips on their first day of snowboarding.

Introduction
Putting on snowboard boots properly is essential for a comfortable and enjoyable snowboarding experience. Snowboard boots come with different types of laces, inner drawstrings, and straps, which can make the process a bit tricky for beginners. Improperly fitting boots can lead to foot pain and can even affect your performance on the slopes. In this article, we will guide you through the step-by-step process of putting on snowboard boots correctly, including choosing the right socks, rolling up your pants, aligning the tongue, dealing with the inner drawstring, securing the drawstring, arranging the laces, adjusting the bottom half of the laces, positioning the tongue, tightening the top half of the laces, tying the laces, managing different types of laces, protecting the laces with pant gaiters, troubleshooting common issues, loosening the laces throughout the day, adjusting for foot pain or heel lifting, and finally, removing the boots. So let’s dive in!
Choosing the Right Socks
Before you start putting on your snowboard boots, it is important to wear the right socks. While snowboard socks are recommended, any long pair of socks will work just fine. The key is to have a sock that provides comfort, warmth, and moisture-wicking properties. Make sure your socks are not too thick, as they can affect the fit of your boots. It is also important to keep your socks pulled up and smooth to avoid any discomfort or bunching inside the boot.
Rolling Up Your Pants
To prevent any interference between your pants and the boot, it is a good idea to roll up your pants before putting on your snowboard boots. This will ensure that no fabric gets caught inside the boot, allowing for a smooth and comfortable fit. Keep the fabric of your pants outside of the boot to avoid any discomfort or restriction of movement.
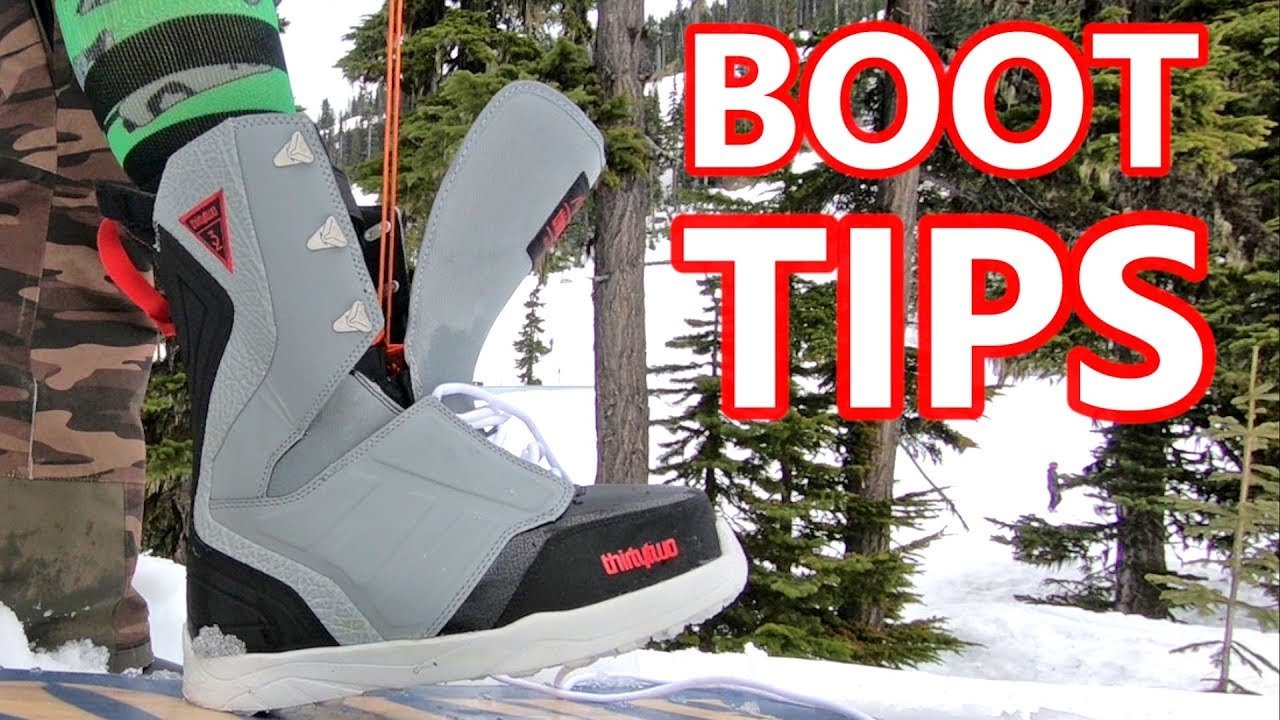
Aligning the Tongue
Once you have your socks on and your pants rolled up, it’s time to put on your snowboard boots. The first step is to align the tongue of the boot with the rest of the inside. Make sure the tongue is not sticking up too high, as this can cause discomfort and affect the overall fit of the boot. Aim to have the tongue level with the rest of the boot’s interior for a proper fit.
Dealing with the Inner Drawstring
Many snowboard boots come with an inner drawstring that helps provide a secure fit. Before tightening the drawstring, make sure it is not tangled or twisted. Untangle it if necessary and ensure that it is snug and tight. Once you have adjusted the drawstring, there is usually a locking mechanism to secure it in place. Slide down the locking mechanism to prevent the drawstring from coming loose.
Securing the Drawstring
After dealing with the inner drawstring, take the remaining length of the drawstring and neatly tuck it into the boot. This will prevent any loose ends from getting in the way or causing discomfort while snowboarding. Keeping the drawstring tucked away will also ensure a clean and streamlined look.
Arranging the Laces
Now it’s time to focus on the laces of your snowboard boots. Start by making sure the bottom half of the laces is snug to your preference. Everyone has different comfort levels, so adjust the tightness of the laces based on your personal preference. Avoid tightening them too much as it can restrict blood flow and cause discomfort.
Adjusting the Bottom Half of the Laces
After securing the bottom half of the laces, it’s important to make sure everything is properly aligned. Ensure that the tongue is facing forward and centered. Sometimes, when tightening the laces, the tongue can be pulled to one side, resulting in an uncomfortable fit. By keeping the tongue centered, you can ensure a snug and comfortable fit.
Positioning the Tongue
With the bottom half of the laces adjusted, it’s time to move to the top half. Tighten the top half of the laces even more to provide additional support and hold your ankle and heel in place. This will enhance the overall stability of your foot inside the boot and prevent any unnecessary movement while snowboarding. Some people prefer to tie a double knot, while others opt for a single knot. Choose whichever method feels more secure to you. Once you have tied your laces, tuck them inside the boot to keep them out of the way.
Tightening the Top Half of the Laces
To ensure a secure and snug fit, it is important to tighten the top half of the laces. This will prevent any slippage or movement of the foot inside the boot. Pay close attention to this step as proper tightness in the top half of the laces is crucial for a comfortable and controlled ride.
Tying the Laces
After adjusting and tightening the laces, it’s time to tie them up. As mentioned earlier, you can choose to tie a double knot for added security, or a single knot if it feels secure enough for you. The important thing is to have a tight and secure knot that will not come undone while you’re on the slopes. Tuck the laces inside the boot to keep them from getting tangled or causing any discomfort.
Managing Different Types of Laces
Snowboard boots come with different types of laces, including traditional laces, BOA systems, and quick tie systems. The key to managing any type of laces is to ensure they are tightened properly and securely. Follow the previous steps mentioned to align the tongue, adjust the laces, and tie them up. The main goal is to have a comfortable and secure fit, regardless of the type of laces on your boots.
Protecting the Laces with Pant Gaiters
To keep the laces of your snowboard boots protected and clean, consider wearing pant gaiters. Pant gaiters are designed to go over the tops of your boots and cover the laces, preventing any snow or debris from entering. This can help prolong the lifespan of your laces and prevent any discomfort caused by snow or ice buildup.
Common Troubleshooting
Occasionally, you may encounter some issues or discomfort while wearing your snowboard boots. Here are some troubleshooting tips to help you address common problems:
-
Loosening the Laces throughout the Day: If you experience discomfort or foot pain throughout the day, it may be a sign that your laces are too tight. To alleviate this, loosen the lower zone laces to relieve some pressure and provide more comfort. Experiment with adjusting the tightness of your laces until you find the right balance between support and comfort.
-
Adjusting for Foot Pain or Heel Lifting: If you feel any foot pain or notice your heel lifting up out of the boot, it may be necessary to readjust your boots. Take off your boots, realign the tongue, and retighten the laces to ensure a snug fit. This will prevent any unwanted movement inside the boot and provide better support.
Removing the Boots
After a day of snowboarding, it’s time to remove your boots. To make the process easier, start by loosening everything as much as possible. Undo all the straps and laces to ensure full flexibility. Once you have loosened everything, lift your foot out of the boot. By following this method, you can easily remove your boots without any unnecessary hassle or discomfort.
Conclusion
Putting on snowboard boots correctly is essential for a comfortable and enjoyable snowboarding experience. By following the steps outlined in this article, beginners can learn the proper techniques to put on their snowboard boots. Remember to choose the right socks, roll up your pants, align the tongue, deal with the inner drawstring, secure the drawstring, arrange the laces, adjust the bottom half of the laces, position the tongue correctly, tighten the top half of the laces, tie the laces securely, and manage different types of laces. Additionally, protect the laces with pant gaiters, troubleshoot common issues, and make any necessary adjustments for foot pain or heel lifting. By mastering the art of putting on snowboard boots, you can ensure a comfortable and enjoyable snowboarding experience every time.
Hi there, I'm Jesse Hull, the author behind AK Fresh Pow. "Shred The Knar There Bud" is not only our tagline, but also our way of life. As a Husband and Father, I embrace the thrill of conquering the slopes. Being a retired Infantry Paratrooper has taught me discipline and a love for adventure. Now, as a new snowboarder/skier, I'm embracing the freedom and adrenaline rush that comes with it. Alongside these passions, I am a full-time student at Alaska Pacific University in Anchorage, Alaska, continuously expanding my knowledge and skills. Join me on this exciting journey as we explore the beauty of the snowy mountains together.